Bourz is a multi-styled blog theme for life, entertainment and fashion. That means you always have the opportunity to choose from different views or options for almost every design material in your site. This document includes the necessary information about using it.
Please do share any thoughts or comments with us. We'd like to hear from you!
If you need help, please do not hesitate to ask us. We'll be ready to reply you on our ThemeForest comments page.
Extract the zipped package that you downloaded from ThemeForest. You'll find a file named "bourz.zip" in "Theme" folder. Now there are 2 ways to start using it:
1) Extract the "bourz.zip" file and upload the extracted folder to the ".../wp-content/themes/" folder on your server.
2) On WordPress admin panel, go to "Appearance > Themes" and click the "Add New" button at the top of the page. Then click "Upload Theme" button. Pick "bourz.zip" file and click "Install Now" button.
After uploading the theme, you need to activate it. Go to "Appearence > Themes" page and click Bourz's "Activate" button. And you're done.
If you face any problem, please visit ThemeForest Knowledgebase to learn how to install a WordPress theme.
Bourz has 3 locations for a menu: Primary Menu, Header Menu and Footer Menu.
For menu setup, go to "Appearance > Menus" page. Choose your items you want to show in menu from the left side. Don't forget to check "Primary Menu", "Header Menu" or "Footer Menu" box to see your menu in correct place. And finally click "Save Menu" button to get it done.
You don't have to use all of the locations. You can show/hide your "Header Menu" and "Footer Menu" locations from your customizer at any time.
Bourz comes with "2 Columns + Sidebar" layout option. If you don't see the sidebar, ensure that you have active widgets on "Appearance > Widgets" page. If not, you can add widgets by drag & drop function to your sidebar.
You can choose your layout on your customizer. Please navigate to "Appearance > Customize > 7. Layout Options" and see what's available over there.
Bourz has a very well organized customizer which almost is a user guide itself. It uses the native customizer of WordPress. So navigate to "Appearance > Customize" and start to personalize your theme!
You can combine different listing styles with Bourz. It's possible to do it in indexed views (Home, Archives etc.) and widgets both. You'll find an example below regarding the usage of listing styles.
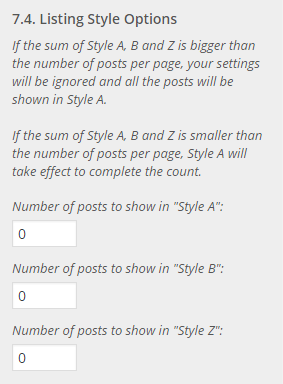
Let's say you have 8 blog posts per page on your site. On customizer, under "7. Layout Options > 7.4. Listing Style Options", the default view is this:
This means all your posts will be shown in default listing style (Style A). Now, when we set the numbers like below:
This means 2 of our posts will be shown in Style A, 4 of them in Style B and 2 of them in Style Z. And the ordering will be like that:
2Style A + 4Style B + 2Style Z = 8 posts total.
Of course, you can set the numbers only for Style A or only for Style B, or Z. It's up to you!
Final Notes
1. If the sum of Style A, B and Z is bigger than the number of posts per page, your settings will be ignored and all the posts will be shown in Style A.
2. If the sum of Style A, B and Z is smaller than the number of posts per page, Style A will take effect to complete the count.
Bourz supports 5 post formats: Standard, Gallery, Video, Aside and Link.
On "Posts > Add New" page, choose your post format from the right side of the panel and then place your content naturally.
By the way, no worries about formatting the content. Bourz is compatible with WordPress native content window and will do everything automatically. For example, if you want to add a gallery, just do it by "Add Media > Create Gallery" in classic way. Then when you have a look at your site, you'll see that the gallery you just added is shaped very well in a slider!*
*Ensure "Instead of Featured Image" or "Both" option is selected under "10.2. Gallery Position" on customizer.
One of the most powerful features of Bourz is letting you to set up the "Featured Image" dimensions. By default, all of the images are resized to 1200 px width and not cropped from height. Change these settings as you wish.
We recommend you to increase the width value if you prefer to use "Fullwidth" layout option to enjoy the high-res images.
Note that these settings will be applied to newly added images only!
Bourz has 13 custom widgets and 7 widget areas: Sidebar, Sidebar - Archive, Sidebar - Page, Sidebar - Post, Upper Widgets, Home Widgets and Footer Widgets. You can place any of your widgets in anywhere you want.
Popular Posts Widget: Some posts are crowded ha? This widget will find and display them. Recent Posts Widget: Display a couple or two of your latest posts. Selected Posts Widget: Display the posts you've selected. Very useful for the posts you want to put forward. Category/Tag Posts Widget: Display the posts belong to a specific category or tag. Post Widget: Maybe you want some special attention for one of your posts. Use this! Recent Comments Widget: Display the latest comments your visitors have dropped. Image Widget: Go ahead and place a nice image with a title and text. You can link it to anywhere too. Tags/Categories Widget: A well styled list of your tags or categories. Search Widget: You can search for anything on your site. Can you believe it? :) Social Widget: Place your social account icons in a sleek list. Find us on Facebook Widget: Show your Facebook page's lovers. Ads Widget: A widget for your Ads. Just place your code and you're done. Empty Space Widget: Just place an empty space between your widgets if you wish. It's very handy!
11.1. Demo Site Upper Widgets Placement
Bourz Widget: Post
Post ID: 26
Style B is selected.
Background Color: #53596a
Date & Title Color: #ffffff
Comment Icon Color: #ffffff
Lens Opacity: 100%
Bourz Widget: Post
Post ID: 64
Style B is selected.
Background Color: #8d9ea0
Date & Title Color: #cee6e9
Comment Icon Color: #cee6e9
Lens Opacity: 100%
Bourz Widget: Post
Post ID: 58
Style B is selected.
Background Color: #e3c3c3
Date & Title Color: #4f4047
Comment Icon Color: #a06161
Lens Opacity: 100%
Post ID values make sense if you've imported the demo content.
Bourz has its own slider plugin. Follow the steps below to start using it!
Firstly, you need to install the "New Bourz Slider" plugin. You'll already realize the "This theme recommends the following plugin: New Bourz Slider." notice when you activate Bourz theme.
Click "Begin installing plugin".
Click "Install" under the "New Bourz Slider" title. The "Install" button will appear when you rollover the title.
When you see the "Return to Required Plugins Installer" link appeared, it means you're done! But don't forget to activate the plugin.
You'll realize that a button named "New Bourz Slider" is placed on your admin panel menu now. If you can't see it, just click to "Dashboard" or somewhere else to refresh the view.
After installing & activating the slider plugin, just navigate to "Appearance > Customize > 5. Slider Settings > 5.5. Blog Posts in Slider" and check "Show Blog Posts in Slider" to see it. OR, you can create your own slides.
Now, let's create our first slide:
Click "New Bourz Slider > Add New Slide".
If you wish, you can directly insert a post into your slider by selecting it from the "Post Direction" drop down. After selecting it, you can override its properties (Title, Slide Image etc.) too.
To create a brand new slide, just do not select a post and fill in the other fields (Title, URL etc.).
Don't forget that you should use the same group name for the slides/posts you want to see in the same slider. (It's the same procedure with tagging a blog post.)
Click "Publish" and your slide is ready!
You can repeat the steps above to create all the slides you want. Now it's time to place our slider to the site:
Navigate to "Appearance > Customize > 5. Slider Settings".
Place this code to the "5.4. Slider Shortcode" box: [new_bourzslider group="your_group"] Don't forget to replace the your_group part with your own group name.
That's all!
Using "Fullwidth" Option for Slider
When you choose "Fullwidth" for slider, it makes the container fullwidth, not the image. So, you should try to upload a bigger image or use a plugin like Regenerate Thumbnails to resize the uploaded images if they're already big enough.
By the way, don't forget to set a high image width for slider. Navigate to "Appearance > Customize > 5.1. Slide Image Width" and you'll find the necessary information there. You should upload your images into the media library (or use Regenerate Thumbnails)AFTER you set the slide width value. So the process ordering is like that:
Set the slide image width. (5.1. Slide Image Width)
Choose "Fullwidth" option for slider. (5.3. Slider Position & View)
Translation is extremely easy with Bourz. Just go to "Appearance > Customize" on WordPress admin panel, find "19. Translation" section and start to translate!
We hope you'll love Bourz and its features. Again, don't hesitate to share any thoughts, ideas, comments or requests with us. We're here to help you and to make your Bourz experience better.